Welcome back to our tutorial on building themes with JavaScript. In part one, we considered the JavaScript web landscape and looked at where we are today. I suggested that while JavaScript lets us render content in new and interesting ways, there are challenges when it comes to fetching the content in the first place.
Watch the video presentation or read the written transcript below.
Screencast
Demo Materials
You’ll find accompanying material for this screencast available in a public GitHub repo — each screencast has a corresponding folder with very simple theme that can be activated.
Time for a REST
With traditional WordPress themes, we’ve been able to use all manner of loops and custom queries to get data. In shifting our approach to be less PHP-centric, where will our data come from?
The missing piece of our puzzle is a REST API, essentially an HTTP interface for getting data from a source. The REST part stands for REpresentational State Transfer. Think of it as a way of accessing WordPress queries directly through a URL. We can type a URL into our browser and include parameters just like we would with a custom loop, and in the browser we can see pure data from our website.
A REST API also allows you to post data, so the WordPress REST API allows you to add and update content directly without using the admin interface. Certain types of requests do need authentication, the REST API only publicly exposes content which is already revealed by WordPress through other avenues, like RSS feeds.
This all means that you don’t have to worry about connecting to a database, you just use a series of URLs to access different types of content on your site — these are known as endpoints.
The WordPress REST API is due to be fully incorporated in WordPress 4.5, due in the spring of next year. In fact, the infrastructure of the WordPress REST API will be included with WordPress 4.4 and has already been merged into trunk.
Exploring the WordPress REST API
Next, let’s look at some of the basic things we can do with the WordPress REST API.
I have a WordPress environment set up locally where I have installed WP API. Ahead of its inclusion in core, WP API is available as a plugin on the WordPress plugin repository. With the plugin activated, I can navigate to the URL /wp-json/. At this URL I can see an overview of everything that the REST API makes available to me.

As the URL suggests, WP API uses JSON formatted data. This is not compulsory for REST APIs, but most REST APIs will use either JSON or XML formatted data. More recently JSON is the preferred format as it’s less verbose and generally easier to work with. I’m also using a Chrome extension called JSON View, which adds sane line breaks and some colours to make it easier to read the JSON. Without JSON View, the JSON data is quite hard for a human to read!
The REST API adds namespaces to its endpoints. This is to ensure that extensions and future versions of the API don’t break functionality for sites and software that use it. The primary namespace at the moment is wp/v2. This means that we can build our website against version 2 of the REST API. If, in the future, it’s decided that the REST API should be structured differently, this restructure would happen under the namespace of wp/v3. Therefore the REST API could completely change, but what we built for v2 would be safe with the inherent backwards compatibility of the v2 namespace.
So, if we navigate to /wp-json/wp/v2/ we can see all of the information about this namespace. As newcomers, we don’t have to worry about this at the moment, but it’s worth understanding the path we take to what we’re really trying to get from the REST API.
If we add posts/ to the end of the above URL, we finally start seeing the data from our website. By default, posts/ will show us the same content that a generic loop on our homepage would. On a clean install of WordPress, this is usually the 10 most recent posts.
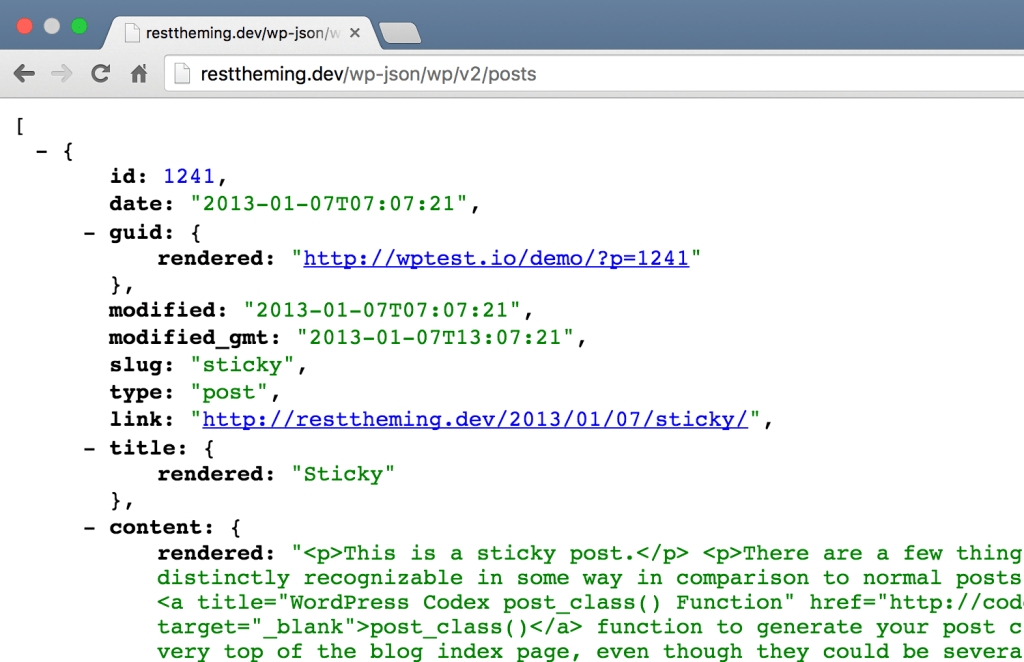
We can further narrow down our request to the REST API by adding a post’s ID to the URL. So in this instance, /wp-json/wp/v2/posts/1241/ will show us just the one post with ID 1241.
The REST API provides typical things that we might want in relation to a post. We can see the date, modified date, permalink, title, content, excerpt, format, whether or not it’s sticky, and more.
Now let’s consider an example where we use the REST API to render content on a page using JavaScript.
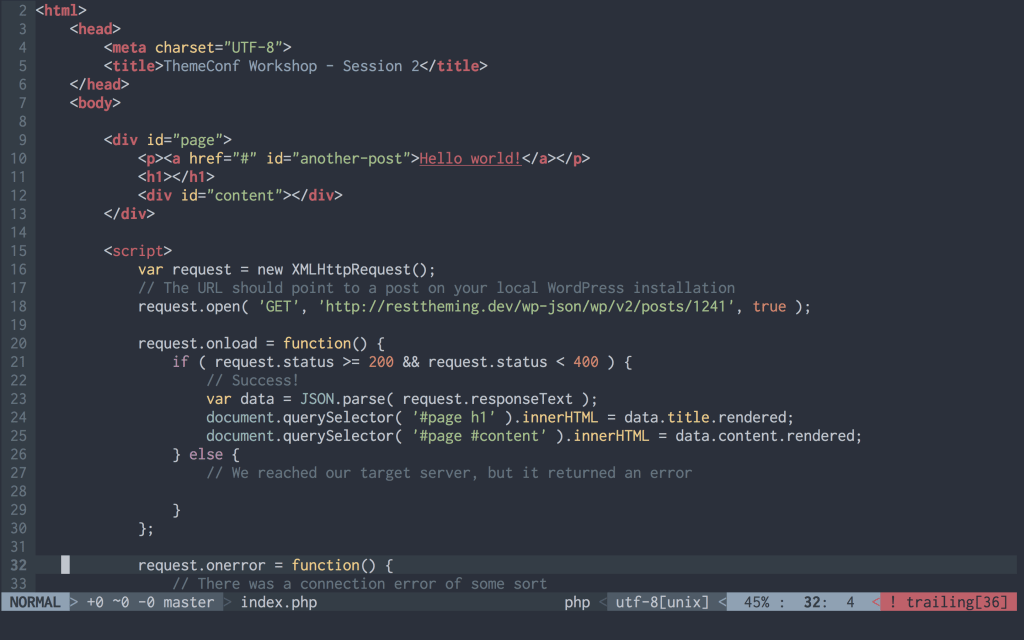
I’ve set up a basic HTML document set up in my text editor, including a div with the id "page", an anchor link with text “Hello world,” and an empty h1 and div element. The div has an id of "content".
Beneath that, we have some inline JavaScript inside a script tag. To begin, we use JavaScript’s native XMLHttpRequest API to fetch our data. This is what’s behind jQuery’s Ajax functions, you may remember this from part 1 when I spoke about the website YouMightNotNeedjQuery.com.
What this does is fetch the URL from the REST API that we were just looking at. If it’s successful, it will parse the JSON response so that we can access the different elements as a JavaScript object. We then use the querySelector and innerHTML methods to change the data in the HTML on this page. At the moment we aren’t dealing with errors, we would want to deal with these if we were doing this in production.
Let’s see how this works. If I activate the session 2 theme on my test site, we can see what this does. There we go, the data from the REST API is being rendered in my theme demo.
One last thing before we end this tutorial. We still have that link that I added at the top — let’s look at how this is connected.
Well, if we go back to the index of our little theme and scroll down, you can see we also have a function, changePost. This does exactly the same thing as the other bit of JavaScript, but it gets a different post (with ID 1). Beneath this, you can see that we add an event listener to the link. The link listens for a click, if it gets clicked it fires the function. Let’s see what happens.
There we have it.
You can now see how a very basic WordPress REST API-based theme can work. In the next screencast we will consider more advanced approaches to theming and the challenges we face when taking this approach.
The Series
- JavaScript, jQuery and the web landscape today
- Introducing REST APIs
- Challenges in JavaScript-Based Theming
- Bringing React into our theme
- Et voila, a JavaScript WordPress theme that uses the WordPress REST API

7 responses
[…] Introducing REST APIs […]
[…] Introducing REST APIs […]
I’m really enjoying this series so far, and very much looking forward to the rest.
I’ve installed and browsed the source for Picard. (Great name by the way) Are you going to be going into more details about how you integrated React into that theme in this series?
Hi Dalton, yep, Picard is in limbo a little at the moment. There are some quite major PRs that need merging.
But yes, by the end of the series you should be up to speed on how Picard works. Thanks for your comment about the name! 🙂
Reblogged this on WPThemeMakeover and commented:
The #1 learning resource on WordPress REST API. Not to be missed for all WordPress theme developers.
This is a fantastic series. Thanks so much for your work on it; its really well-done.
[…] we considered the JavaScript web landscape and where it leaves us today. In part two we looked at the forthcoming WordPress REST API. In part three, we’ll will consider the most pertinent question: how do we apply all this to […]